As more and more sites move past simple cookie consent policies and begin implementing more significant privacy strategies, tackling 3rd party scripts served through Tag Mangers such as Google Tag Manager is more critical. Initially, this involved creating trigger policies on a per-Tag level, which became incredibly manual for larger GTM implementations.
Thankfully, in September of 2020, Google Tag Manager released the Consent Mode beta, providing an easier way to implement an organization’s Cookie Consent policy in a more efficient and integrated fashion.
How to use Google Tag Manager’s Consent Mode
Google’s Consent Mode allows you to adjust how your Google tags behave based on the consent level your users have selected. These options often line up with several supported consent management tools found here.
While most sites will often focus primarily on ad_storage and analytics_storage, the complete list of statuses that Google Consent Mode supports are:
| Consent Type | Description |
| ad_storage | Enables storage (such as cookies) related to advertising |
| analytics_storage | Enables storage (such as cookies) related to analytics, e.g., visit duration |
| functionality_storage | Enables storage that supports the functionality of the website or app, e.g., language settings |
| personalization_storage | Enables storage related to personalization, e.g., video recommendations |
| security_storage | Enables storage related to security such as authentication functionality, fraud prevention, and other user protection |
Getting Started with Consent Mode in Google Tag Manager
To begin sorting which Tags within your Google Tag Manager account are configured for consent, you’ll want to enable Consent Overview in your GTM container:
- Within Google Tag Manager
- Click Admin
- Select Container Settings.
- Under Additional Settings
- Check Enable consent overview.

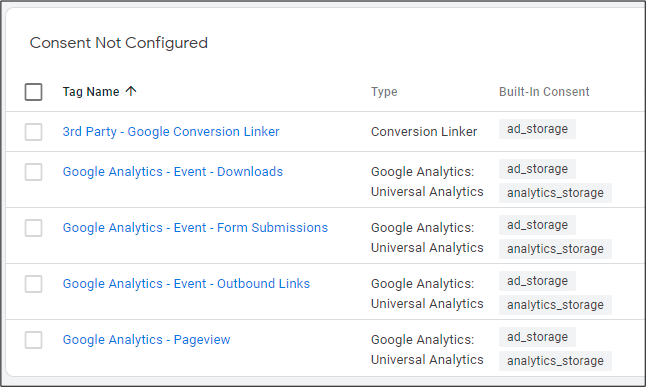
These steps will group all tags within your container into the following two categories:
- Consent Not Configured:
- Lists tags where no consent action has been taken. These tags are in the ‘not set’ state.
- Consent Configured:
- List of tags where Additional Consent Checks has been set to either “No additional consent required” or “Require additional consent for tag to fire.”
Editing your Tags Consent Status
Once enabled, you can view your tag Content Overview under the Tags category in the left navigation and click the Consent Overview (Shield) icon.
This step will showcase the Consent Configuration pane showing all your tags and their category.

To adjust each tag individually (or in bulk):
- Select the checkboxes to the left of each tag to select which tag you would like to update.
- When one or more tags are selected, click the Edit Consent Settings icon.
- Modify settings for Additional Consent Checks by selecting either:
- Not set:
- Default. No additional consent checks are performed by this tag.
- No additional consent required:
- Select this option to indicate that your tag does not need to check for additional consent to fire. You may choose to use this option to distinguish tags that need no additional consent outside of their built-in consent checks for any tags that you have not yet reviewed.
- Require additional consent for tag to fire:
- This tag will only fire if the status of all specified consent types is ‘granted’ when the tag is triggered. The + Add required consent button will appear if you select this option. Use this button to add additional consent types. Tag Manager supports the consent types listed in the table below, and you can add your custom consent types based on what is supported by your consent management platform.
- Not set:
- Once selected and adjusted, click Save and test or publish your container
- Test your cookie policy against your Cookie Policy or Consent Management Tool to ensure tags are firing correctly.
For an incredible deep dive, make sure to check out Simo Ahava’s Consent Mode Walkthrough.


